Tutorial
I thought I would put a little "how-to" post on here to show how I've been shooting some of my motion shots on vehicles.
I've had quite a few comments and questions from people since starting to shoot these shots, so I figured it would be a good thing to share. (I've also been asked on more than one occasion if I worked for Google Maps. haha - Don't I wish!)
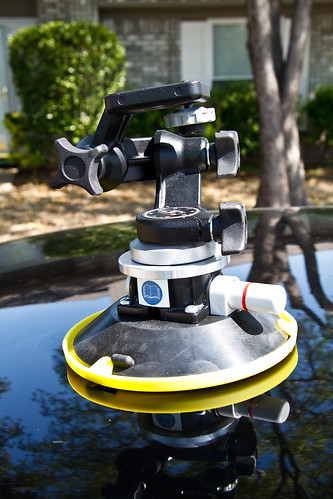 There are a few parts that you will need to do this type of shot. If you are a professional, or even a serious amateur, you should have most of the parts already. First and most importantly, you will need to purchase a suction mount for your camera. I purchased mine from www.filmtools.com. It is fairly cheap when you consider what photography equipment typically costs. It is essentially a suction cup with a tripod head mounted to it. The tripod head is made by Bogen/Manfrotto, so you are really getting a suction cup AND a new tripod mount for under $100.
You can see what it looks like to the right.
It is really very simple. The yellow plastic covers the cup itself during storage and prevents thing from cutting into it and puncturing it, thus ensuring the suction.
You will also need 2 PocketWizards, and a shutter release cable to run from the PocketWizard do the camera. They run around $100 if you buy them from PocketWizard directly, but FlashZebra has them for under $30.
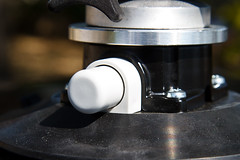
To get it to stick to the car, remove the yellow plate, and find a flat surface. Then start pushing on the white button repeatedly until the red line is hidden. The button forces the air out of the cup and creates a vacuum.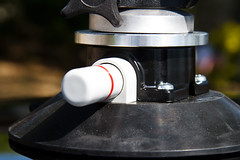
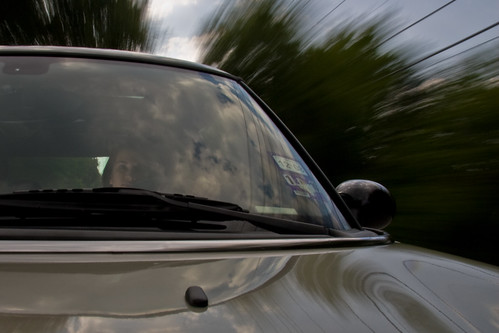
 Once that is set up, its time to attach the camera. Most tripod heads have plates that allow for quick removal of the camera. This head has a built-in screw to ensure the camera doesn't fly off the head while you are driving. Simply screw the camera on and you're done.
I used a Canon 30D for this, as I don't want to run the risk of my good camera falling off of a vehicle. However, I have never had any issues with this setup and have used it at least a half-dozen times or more. But I don't want to take any chances. However, if you only have one camera, you should be fine. Before I had my new camera I used the 30D on at least 4 or 5 outtings with this rigging and never had a single issue.
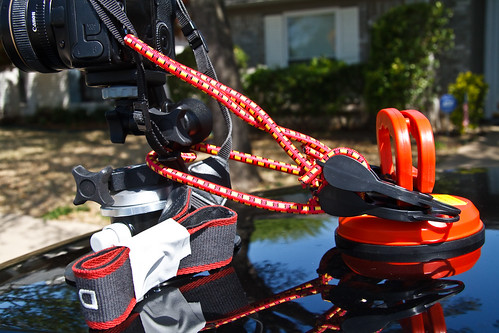
Since cameras aren't cheap, we are going to be using a 'safety net' in the unlikely even that something goes wrong. Harbor Freight has "dent removal" suction cups for about $10 each.
They work nicely in combination with some bungee cords.
 I put the secondary suction cup a little under a food from the first one (you will need to adjust this based on the length of your bungee cords).
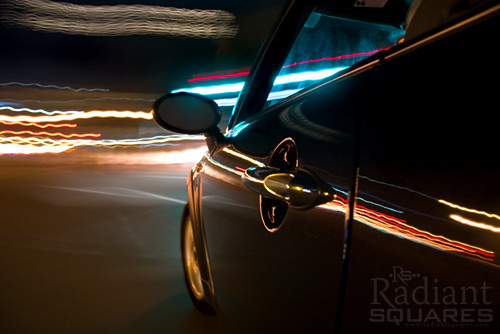
Then run one cord through the loop in the camera strap so if it falls, the camera sill at least stay on the side of your car until you can stop. The second bungee I wrap around the primary suction cup itself to try to keep that from hitting the ground should it fail.
On a side note, try to find bungee cords with plastic ends. You don't want to scratch up your paint with the metal hooks if one should fly loose while you are setting everything up.
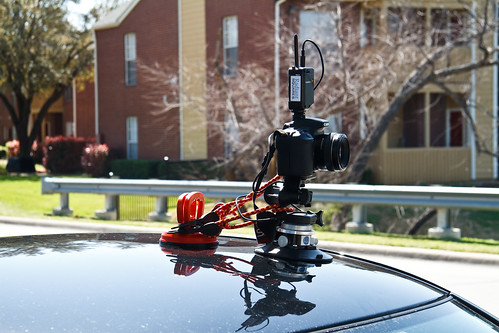
The final setup should look like this:
In this shot I taped the camera strap up so it wasn't blowing in the wind. I have had some shots ruined because the strap flew up into the shot, or over the lens.
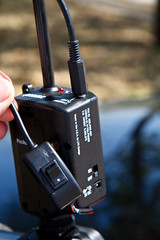
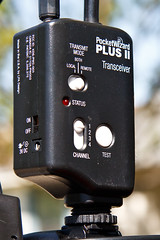 Once that is all secure, you can put your pocket wizard on the camera's hot shoe. Set it to "remote" and chose the channel you would like. Then attach the shutter release cable to the "camera" outlet. Plug the other end of the cord into your camera.
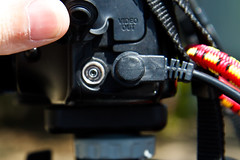 On Nikons, this is higher up on the camera, to the left of the prism. On Canon's it is at the bottom of the camera, typically where all the other plugs go.
 The cord should have a switch on it, which will keep your camera from "going to sleep" in between shots. Most of us don't want our cameras on constantly, so the typical auto-shut0ff time is about 1-2 minutes. This switch will keep the camera on past those two minutes. However, just as a precaution, I would go into the camera's menu and set the sleep time to about 15-30 minutes. That way you don't have to worry about missing a great shot because your camera shut off by accident.
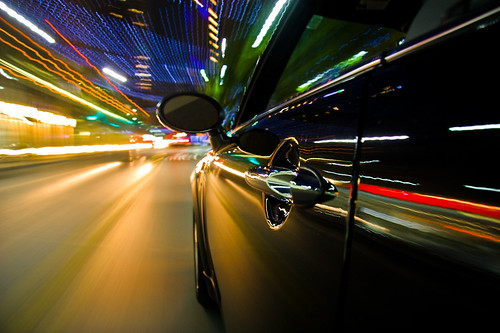
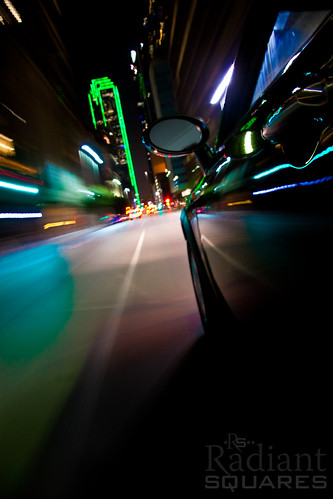
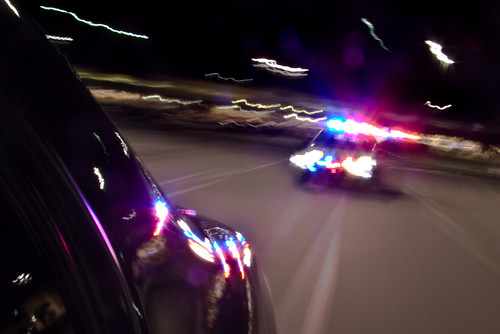
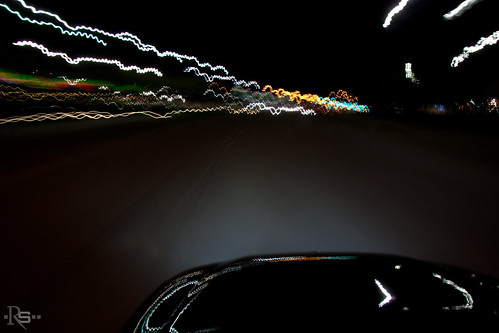
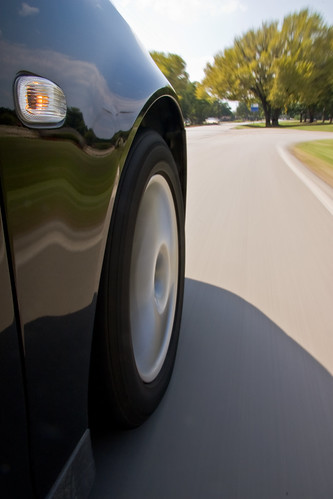
It is important to note at this point, that if you want to be able to shoot instantly while driving, the lens must be in "manual focus" mode. Otherwise the camera will try to focus on whatever it can while you are moving, which doesn't always yield good results and does not ensure an immediate "click" when you push the trigger button. I typically let the camera auto-focus to about where I think I want my focal point in my images, then switch it to MF. The usual purpose of shooting with the camera on the vehicle is to get cool streaking shots, so setting a high aperture will not only ensure good depth of field should your subject not be exactly in the focal region, but will also slow your shutter down enough so you can get a good blurring effect.
I'd recommend leaving the shutter open anywhere from 2-5 seconds per frame. If your shots are still overexposed at that shutter speed, you may want to purchase an ND filter to put on your lens. This should help a lot.
Run a quick test to make sure everything is working properly. Turn the camera and pocket wizards on, and while standing next to the cameras, fire a few test rounds. At this time, you can also adjust the camera to get the composition just right for your shot.
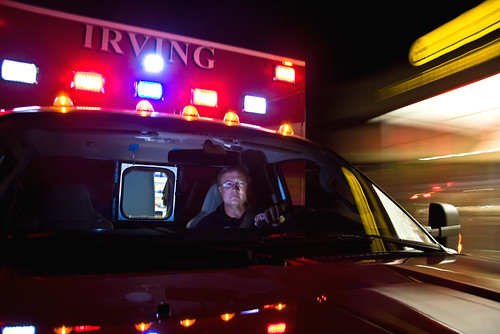
Once you are happy with how it looks, you're ready to hit the road!
Good luck!
I've had quite a few comments and questions from people since starting to shoot these shots, so I figured it would be a good thing to share. (I've also been asked on more than one occasion if I worked for Google Maps. haha - Don't I wish!)
There are a few parts that you will need to do this type of shot. If you are a professional, or even a serious amateur, you should have most of the parts already. First and most importantly, you will need to purchase a suction mount for your camera. I purchased mine from www.filmtools.com. It is fairly cheap when you consider what photography equipment typically costs. It is essentially a suction cup with a tripod head mounted to it. The tripod head is made by Bogen/Manfrotto, so you are really getting a suction cup AND a new tripod mount for under $100.You can see what it looks like to the right.
It is really very simple. The yellow plastic covers the cup itself during storage and prevents thing from cutting into it and puncturing it, thus ensuring the suction.
You will also need 2 PocketWizards, and a shutter release cable to run from the PocketWizard do the camera. They run around $100 if you buy them from PocketWizard directly, but FlashZebra has them for under $30.
To get it to stick to the car, remove the yellow plate, and find a flat surface. Then start pushing on the white button repeatedly until the red line is hidden. The button forces the air out of the cup and creates a vacuum.
Once that is set up, its time to attach the camera. Most tripod heads have plates that allow for quick removal of the camera. This head has a built-in screw to ensure the camera doesn't fly off the head while you are driving. Simply screw the camera on and you're done.I used a Canon 30D for this, as I don't want to run the risk of my good camera falling off of a vehicle. However, I have never had any issues with this setup and have used it at least a half-dozen times or more. But I don't want to take any chances. However, if you only have one camera, you should be fine. Before I had my new camera I used the 30D on at least 4 or 5 outtings with this rigging and never had a single issue.
Since cameras aren't cheap, we are going to be using a 'safety net' in the unlikely even that something goes wrong. Harbor Freight has "dent removal" suction cups for about $10 each.
They work nicely in combination with some bungee cords.
I put the secondary suction cup a little under a food from the first one (you will need to adjust this based on the length of your bungee cords).Then run one cord through the loop in the camera strap so if it falls, the camera sill at least stay on the side of your car until you can stop. The second bungee I wrap around the primary suction cup itself to try to keep that from hitting the ground should it fail.
On a side note, try to find bungee cords with plastic ends. You don't want to scratch up your paint with the metal hooks if one should fly loose while you are setting everything up.
The final setup should look like this:
In this shot I taped the camera strap up so it wasn't blowing in the wind. I have had some shots ruined because the strap flew up into the shot, or over the lens.
Once that is all secure, you can put your pocket wizard on the camera's hot shoe. Set it to "remote" and chose the channel you would like. Then attach the shutter release cable to the "camera" outlet. Plug the other end of the cord into your camera.On Nikons, this is higher up on the camera, to the left of the prism. On Canon's it is at the bottom of the camera, typically where all the other plugs go.The cord should have a switch on it, which will keep your camera from "going to sleep" in between shots. Most of us don't want our cameras on constantly, so the typical auto-shut0ff time is about 1-2 minutes. This switch will keep the camera on past those two minutes. However, just as a precaution, I would go into the camera's menu and set the sleep time to about 15-30 minutes. That way you don't have to worry about missing a great shot because your camera shut off by accident.It is important to note at this point, that if you want to be able to shoot instantly while driving, the lens must be in "manual focus" mode. Otherwise the camera will try to focus on whatever it can while you are moving, which doesn't always yield good results and does not ensure an immediate "click" when you push the trigger button. I typically let the camera auto-focus to about where I think I want my focal point in my images, then switch it to MF. The usual purpose of shooting with the camera on the vehicle is to get cool streaking shots, so setting a high aperture will not only ensure good depth of field should your subject not be exactly in the focal region, but will also slow your shutter down enough so you can get a good blurring effect.
I'd recommend leaving the shutter open anywhere from 2-5 seconds per frame. If your shots are still overexposed at that shutter speed, you may want to purchase an ND filter to put on your lens. This should help a lot.
Run a quick test to make sure everything is working properly. Turn the camera and pocket wizards on, and while standing next to the cameras, fire a few test rounds. At this time, you can also adjust the camera to get the composition just right for your shot.
Once you are happy with how it looks, you're ready to hit the road!
Good luck!
posted by raydetwiler at
12:01 PM
![]()
![]()

1 Comments:
Awesome, man! Thanks for posting this!
Post a Comment
Subscribe to Post Comments [Atom]
<< Home